
NEW ! Snowplow for pick-up
01.12.2023 Read more >

SIA ML-SERVISS Maskavas ielas fil.
Address: Mazjumpravas street 66, Riga, Latvia, LV-1063
Phone: (+371) 66116670
(+371) 29212095
Email: info@mlserviss.lv
WhatsApp (+371) 29212095
SIA ML-SERVISS filiāle "Jugla"
Address: Brivibas gatve street 422, Riga, Latvia, LV-1024
Phone: (+371) 29522111
Email: brivibas@mlserviss.lv
| Product | Code | Price | Number | |
Paklājs bagāžniekā FORD MONDEORubber trunk mat producer Rezaw-Plast, especial made mat for each model using 3D floor scan technology. Stock: 0 pcs.  |
BPR230479 |
Price: 57.00 € |
|
|
MoldingsMoldings Stock: > 1 pcs.  |
8365 |
Price: 18.00 € |
|
|
Virsbūves grīdas pretkorozijas līdzeklisPROFESSIONAL. Stock: > 1 pcs.  |
20-A09 |
Price: 13.00 € |
|
|
Paklāju un sēdekļu tīrīšanas līdzeklisUniversal tool for scrub cleaning all types of upholstery. Potent foam effectively removes dirt and stains from deeper layers of fabric, making fabric seats, upholstery, vinyl upholstery and floor mats look like new. Ensures perfect cleaning effect Stock: > 1 pcs.  |
19-023 |
Price: 4.00 € |
|
|
Textile car mats Volvo XC90Textile floor mats - made from special auto textile material. Good protection from dust and water. Easy to clean and wash. Ads additional sound isolation and makes your interior more elegant and comfortable. Stock: > 1 pcs.  |
Volvo XC90 II-pol |
Price: 65.00 € |
|
|
Engine, gearbox and radiator protection MET HYUNDAI I 40Stock: 0 pcs.  |
4.0364.00 |
Price: 184.00 € |
|
|
Velo turētājsRoof bike racks JUZA Stock: > 1 pcs.  |
JUZA |
Price: 65.00 € |
|
|
lādēšanas ierice USB-Charger with two USB outputs and charging data. Stock: > 1 pcs.  |
0619SK |
Price: 11.00 € |
|
|
LED Strobo gaismeklisLED strobo light Stock: 0 pcs.  |
LW0040 |
Price: 19.00 € |
|
|
LED warning beaconStock: 0 pcs.  |
ALR0038 |
Price: 45.00 € |
|
|
Aizmugures bampera uzlika VW GOLF VI PlusDo you often ship purchases, baggage, building materials, or travel with a dog? Stock: 0 pcs. 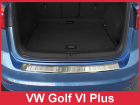 |
2/35389 |
Price: 69.00 € |
|
|
Uzgriežņu atslēgu komplektsCode RT0200 Stock: 0 pcs.  |
RT0200 |
Price: 12.00 € |
|
|
Strāvas pārveidotājsConverter 24V/230V Stock: 0 pcs.  |
E1373 |
Price: 67.00 € |
|
|
AdaptersAdapter 13/7 PIN Stock: > 1 pcs.  |
ADK E1334-A |
Price: 15.00 € |
|
|
Auto sakabes āķis LEXUS UX 200VERTICAL DETACHABLE TOWBAR Stock: 0 pcs.  |
O 101V |
Price: 490.25 € |
|
|
Auto sakabes āķis LEXUS UX 200The towbar is original, designed for a specific model. Stock: 0 pcs.  |
O 101A |
Price: 333.96 € |
|
|
Auto sakabes āķis LEXUS UX 200Tow bar with screw fixation. Tow bar constructed accordingly all European and car producer standards. Installs accordingly car producer mounting places. Kit contains all necessary parts for installation. Stock: 0 pcs.  |
O 101 |
Price: 248.49 € |
|
|
Tow bar CITROEN C4/C 4 X /JEEP AVENGERVERTICAL DETACHABLE TOWBAR Stock: 0 pcs.  |
P 46V |
Price: 425.00 € |
|
|
Tow bar CITROEN C4/C 4 X /JEEP AVENGERThe towbar is original, designed for a specific model. Stock: 0 pcs.  |
P 46A |
Price: 288.00 € |
|
|
Tow bar CITROEN C4/C 4 X /JEEP AVENGERTow bar with screw fixation. Tow bar constructed accordingly all European and car producer standards. Installs accordingly car producer mounting places. Kit contains all necessary parts for installation. Stock: 0 pcs.  |
P 46 |
Price: 230.00 € |
|
|
