Informācija par sīkdatņu izmantošanu.
Šī vietne izmanto sīkdatnes, lai uzlabotu lietošanas pieredzi un optimizētu tās darbību.
Turpinot lietot šo mājas lapu, Jūs piekrītiet sīkdatņu lietošanai SIA ML-SERVISS tīmekļa vietnē.
Lasīt vairāk
LumiTec Limited halogen bulbs made of high quality quartz glass with a suitable color thanks to which a light temperature of 4300K is achieved. Giving practically a beam of long-range light and a color very similar to daylight. Thanks to them the driving comfort is much better because our route will be mostly illuminated and safe. These bulbs have UV filter which ensures our reflector of possible matting. They have German approval E1 printed on the base of the bulb. Benefits of the LumiTec Limited bulb: • 130% higher lighting * • a beam of light longer up to 40m * • whiter light similar to daylight • greater safety and driving comfort * compared to standard halogen bulbs Use: • low beam • high beam • curve lighting Technical specification: • Type: H7 • Voltage: 12V • Power: 55W • Base: PX26d • Packing: 2 pcs. • UV filter: Yes • Homologation: E1
00R4-PL-STD Lazer Lamp Set 1 pcs Ultra long-range optics • High output LED’s from world leader in LED technology • Integrated Position Lights for added safety and improved styling • CAE optimised heatsink • Electronic thermal management • ‘Unbreakable’ polycarbonate lens • Innovative design and unique styling -during installation, LAZER 8231-12VSP wires are required.
The ideal solution for wiring a pair of Triple-R 750, 850, 1000 and 1250 (with Position Light) lamps. The setup is quick, easy, and reliable with TE Superseal connections and no configuration procedures.
Lazer harness kits feature a 12V relay, 25A fuse, and battery terminal at one end. We use a pair of Scotch Lock connectors to facilitate the integration into your vehicle's electrical system, while ensuring that the connection remains fully protected.
All Lazer lamps are sold with a pre-wired female connector attached to the male connector of the lamp harness, to facilitate wiring in to your vehicle system.
The towbar is original, designed for a specific model. -Included is everything necessary for installation.
VERTICAL DETACHABLE TOWBAR Mounting of the detachable towbar
A. Before installing the detachable towball you must be sure it is in the `set` position. This can be seen from the color in the indicator window of the operation handle: this should be `red`. If this is not the case then push in the operation handle firmly to the end and then rotate the Handle - while keeping it pushed in - fully clockwise to its end position. The handle now will remain in this (`set`) position. B. Remove the plastic weather cap and ensure that the housing is clear of any mud, gravel, road debris, i.e. Insert the detachable towbar into housing and move it up until the triangular pins are set into the corresponding recesses (left & right) of the housing. While inserting the detachable towbar into the housing keep your hands away from the operation handle. Next, pull the ball itself towards you while holding the towbar in the above position, i.e. triangular pins resting into their corresponding recesses (left/right) in the housing. The system then will automatically lock and the operation handle will turn to indication green and will also pop out about 5 mm. CHECK THIS ! Always check the indicator window in the operation handle shows`green` every time before you start towing. If this is not the case, remove the towbar and start the mounting process again at point `A`. C. The key operated lock is an anti theft device only. It is not involved with safe attachment Of the detachable towbar. It is safe to tow with the key operated lock unlocked as long as the towbar is correctly attached as described above. D. Lock the towball by turning the key clockwise half a turn. Remove the key, after this the operation handle can no longer be pushed in and not be turned enough to activate the mechanism. If the towbar can be locked this also confirms that the towbar is correctly installed. It is essential that the indicator in the handle shows `green` prior to towing. Remember to remove the key from the lock before starting your journey. The towbar is then ready to be used.
Removal of the detachable towbar system. A. Always remove/unhitch the trailer prior to removing the towball, and remove any accessories if they obstruct the locking system as well as detaching the safety cable. B. Unlock the towball by turning the key anti-clockwise half a turn. C. Hold the detachable towball with the left hand. Push the operation handle fully inwards and then whilst holding it pushed in turn the handle fully clockwise to its end position. The handle will remain in this position. D. Let the detachable towball slide out of the housing while holding it in your hand to prevent it from falling onto the floor. E. After removal of the towball the plastic weather cap should be attached to the housing. F. When not in use keep the towball in safe, clean and dry place. If kept in the vehicle this must be located such that it is not free to enter the passenger compartment in the event of heavy braking, heavy cornering or in case of an accident.
The towbar is original, designed for a specific model. -Included is everything necessary for installation.
Semi-automatic towbar Mechanism with quickly demountable ending
Body install: 1. Fix body of the mechanism to brackets by bolts M12x25mm.
Ball fastening: 1. To install the ball in mechanism push the lever down till resistance. 2. Slip the ball into body in this way so pins if the ball will be in nests of the body. 3. Let go the lever. It should return to initial position, this means correctly installed ball in the mechanism. 4. Put safety pin through lever's hole and bracket's hole. Correctly placed safety pin.
Ball unfastening: 1.To unfasten the ball take out the safety pin. 2.Push the lever down till resistance. 3.With fast move take out the ball. Let go the lever. It should return to initial position. 4.Put plug into the body. Plugs are in accessories of the towbar with quickly demountable ending.
The towbar is original, designed for a specific model. -Included is everything necessary for installation.
Tow bar with screw fixation. Tow bar constructed accordingly all European and car producer standards. Installs accordingly car producer mounting places. Kit contains all necessary parts for installation. ATTENTION !!! Electro installation kit not included.
VERTICAL DETACHABLE TOWBAR Mounting of the detachable towbar
A. Before installing the detachable towball you must be sure it is in the `set` position. This can be seen from the color in the indicator window of the operation handle: this should be `red`. If this is not the case then push in the operation handle firmly to the end and then rotate the Handle - while keeping it pushed in - fully clockwise to its end position. The handle now will remain in this (`set`) position. B. Remove the plastic weather cap and ensure that the housing is clear of any mud, gravel, road debris, i.e. Insert the detachable towbar into housing and move it up until the triangular pins are set into the corresponding recesses (left & right) of the housing. While inserting the detachable towbar into the housing keep your hands away from the operation handle. Next, pull the ball itself towards you while holding the towbar in the above position, i.e. triangular pins resting into their corresponding recesses (left/right) in the housing. The system then will automatically lock and the operation handle will turn to indication green and will also pop out about 5 mm. CHECK THIS ! Always check the indicator window in the operation handle shows`green` every time before you start towing. If this is not the case, remove the towbar and start the mounting process again at point `A`. C. The key operated lock is an anti theft device only. It is not involved with safe attachment Of the detachable towbar. It is safe to tow with the key operated lock unlocked as long as the towbar is correctly attached as described above. D. Lock the towball by turning the key clockwise half a turn. Remove the key, after this the operation handle can no longer be pushed in and not be turned enough to activate the mechanism. If the towbar can be locked this also confirms that the towbar is correctly installed. It is essential that the indicator in the handle shows `green` prior to towing. Remember to remove the key from the lock before starting your journey. The towbar is then ready to be used.
Removal of the detachable towbar system. A. Always remove/unhitch the trailer prior to removing the towball, and remove any accessories if they obstruct the locking system as well as detaching the safety cable. B. Unlock the towball by turning the key anti-clockwise half a turn. C. Hold the detachable towball with the left hand. Push the operation handle fully inwards and then whilst holding it pushed in turn the handle fully clockwise to its end position. The handle will remain in this position. D. Let the detachable towball slide out of the housing while holding it in your hand to prevent it from falling onto the floor. E. After removal of the towball the plastic weather cap should be attached to the housing. F. When not in use keep the towball in safe, clean and dry place. If kept in the vehicle this must be located such that it is not free to enter the passenger compartment in the event of heavy braking, heavy cornering or in case of an accident.
Semi-automatic towbar Mechanism with quickly demountable ending
Body install: 1. Fix body of the mechanism to brackets by bolts M12x25mm.
Ball fastening: 1. To install the ball in mechanism push the lever down till resistance. 2. Slip the ball into body in this way so pins if the ball will be in nests of the body. 3. Let go the lever. It should return to initial position, this means correctly installed ball in the mechanism. 4. Put safety pin through lever's hole and bracket's hole. Correctly placed safety pin.
Ball unfastening: 1.To unfasten the ball take out the safety pin. 2.Push the lever down till resistance. 3.With fast move take out the ball. Let go the lever. It should return to initial position. 4.Put plug into the body. Plugs are in accessories of the towbar with quickly demountable ending.
Tow bar with screw fixation. Tow bar constructed accordingly all European and car producer standards. Installs accordingly car producer mounting places. Kit contains all necessary parts for installation. ATTENTION !!! Electro installation kit not included.
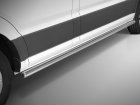
Stainless steel side bars (SWB) - Volkswagen Crafter (2017 -) Side bars Bar diameter: 60 mm Wall thickness: 2 mm side bars - Volkswagen Crafter - highlit the style of your car.
Protection side bar is the best solution for people who want to emphasize the car body line. The product is not intended to be used as a step but perfectly protects threshold from mechanical damage.
Stainless steel steps with 60mm diameter and 2 mm thickness and combination with a hand-finished provide the product for years not only one season.
With the product you will find a stainless steel mounting set for your car and instructions for easy installation. Solid construction ensures static load at 115 kg, so the steps can be successfully used by adults.
Stainless steel (AISI 304) has a very high resistance to corrosion in difficult weather conditions - successfully used in industry including food industry.
We confirm the quality of our products, providing a 24-month warranty on the polished bars and a 12 month warranty on the black bars paintwork.
Stainless steel side bars with plastic steps (SWB) - Volkswagen Crafter (2017 -) side steps - Volkswagen Crafter - safety and comfort.
Side steps with plastic covers provide the best grip during severe weather conditions. Plastic covers are reliable and stable when getting into the car, even during snowy winters and heavy rainfalls. In winter side steps will serve as a practical support during snow removal from the roof, and in summer they will facilitate loading equipment on the roof rack.
Stainless steel steps with 70mm diameter and 2 mm thickness and combination with a hand-finished provide the product for years not only one season.
With the product you will find a stainless steel mounting set for your car and instructions for easy installation. Solid construction ensures static load at 115 kg, so the steps can be successfully used by adults.
Stainless steel (AISI 304) has a very high resistance to corrosion in difficult weather conditions - successfully used in industry including food industry.
We confirm the quality of our products, providing a 24-month warranty on the polished bars and a 12 month warranty on the black bars paintwork.
Stainless steel side bars with checker plate steps (SWB) - Volkswagen Crafter (2017 -) side steps - Volkswagen Crafter - a unique and practical design combined with style and elegance.
Side steps with checker plate steps are a unique and unparalleled in the world design - checker plate, invisible joint and perfectly made finish makes the product fits great with any car.
Stainless steps are made of 76mm diameter and 2 mm thickness bars and in combination with a hand-finished product provide the product for years not only one season.
With the product you will find a stainless steel mounting set for your car and instructions for easy installation. Solid construction ensures static load at 115 kg, so the steps can be successfully used by adults.
Stainless steel (AISI 304) has a very high resistance to corrosion in difficult weather conditions - successfully used in industry including food industry.
We confirm the quality of our products, providing a 24-month warranty on the polished bars and a 12 month warranty on the black bars paintwork.
Code CRAF-L1770-08. Front bar with kid plate for VW CRAFTER. This product has an EU CERTIFICATE, which allows it to be used throughout the EU, as well as pass vehicle inspection without having to remove it. The arc has been designed in accordance with the new EU standards and has successfully passed all certification tests. Made of high quality stainless steel, hand polished. - Pipe diameter: 70 mm - Wall thickness: 2 mm - Weight: 14,2 kg Includes mounting instructions and necessary mounting brackets.
Code CRAF-R1770-06. Front bar for VW CRAFTER. This product has an EU CERTIFICATE, which allows it to be used throughout the EU, as well as pass vehicle inspection without having to remove it. The arc has been designed in accordance with the new EU standards and has successfully passed all certification tests. Made of high quality stainless steel, hand polished. - Pipe diameter: 70mm - Wall thickness: 2 mm - Weight: 10,6 kg Includes mounting instructions and necessary mounting brackets.
Code CRAF-L1770-05. Front bar for VW CRAFTER. This product has an EU CERTIFICATE, which allows it to be used throughout the EU, as well as pass vehicle inspection without having to remove it. The arc has been designed in accordance with the new EU standards and has successfully passed all certification tests. Made of high quality stainless steel, hand polished. - Pipe diameter: 70mm - Wall thickness: 2 mm - Weight: 9,5 kg Includes mounting instructions and necessary mounting brackets.
Code CRAF-R1770-03. Front bar for VW CRAFTER. This product has an EU CERTIFICATE, which allows it to be used throughout the EU, as well as pass vehicle inspection without having to remove it. The arc has been designed in accordance with the new EU standards and has successfully passed all certification tests. Made of high quality stainless steel, hand polished. - Pipe diameter: 70mm - Wall thickness: 2 mm - Weight: 11,7 kg Includes mounting instructions and necessary mounting brackets.
Code CRAF-R1770-04. Front bar with skid plate for VW CRAFTER. This product has an EU CERTIFICATE, which allows it to be used throughout the EU, as well as pass vehicle inspection without having to remove it. The arc has been designed in accordance with the new EU standards and has successfully passed all certification tests. Made of high quality stainless steel, hand polished. - Pipe diameter: 70mm - Wall thickness: 2 mm - Weight: 15 kg Includes mounting instructions and necessary mounting brackets.
Code CRAF-R1770-00. Front bar with grill type protection for VW CRAFTER. This product has an EU CERTIFICATE, which allows it to be used throughout the EU, as well as pass vehicle inspection without having to remove it. The arc has been designed in accordance with the new EU standards and has successfully passed all certification tests. Made of high quality stainless steel, hand polished. - Pipe diameter: 70mm - Wall thickness: 2 mm - Weight: 15,9 kg Includes mounting instructions and necessary mounting brackets.
Code MUSSO-R1876-GR. Roll bar for SSANGYONG MUSSO. The arc has been designed in accordance with the new EU standards and has successfully passed all certification tests. Made of high quality stainless steel, hand polished. - Pipe diameter: 76 mm - Wall thickness: 2 mm - Weight: 16,5 kg Includes mounting instructions and necessary mounting brackets.