Informācija par sīkdatņu izmantošanu.
Šī vietne izmanto sīkdatnes, lai uzlabotu lietošanas pieredzi un optimizētu tās darbību.
Turpinot lietot šo mājas lapu, Jūs piekrītiet sīkdatņu lietošanai SIA ML-SERVISS tīmekļa vietnē.
Lasīt vairāk
Wind deflectors HEKO for side doors are an important element of car accessories. They enable natural exchange of air inside the vehicle. They prevent windows from fogging on rainy days, since they allow ventilation of the car interior. When the window is open, wind deflectors protect the driver against the direct impact of gushes of wind. They decrease dirt on side windows, enabling better view in wing mirrors. They make it possible to open windows even during heavy rain or snow. They highlight the style line of the vehicle. The picture presented here shows an example of fitted side wind deflector. Heko is the leading Polish producer of wind deflectors for passenger cars, buses.
Wind deflectors HEKO for side doors are an important element of car accessories. They enable natural exchange of air inside the vehicle. They prevent windows from fogging on rainy days, since they allow ventilation of the car interior. When the window is open, wind deflectors protect the driver against the direct impact of gushes of wind. They decrease dirt on side windows, enabling better view in wing mirrors. They make it possible to open windows even during heavy rain or snow. They highlight the style line of the vehicle. The picture presented here shows an example of fitted side wind deflector. Heko is the leading Polish producer of wind deflectors for passenger cars, buses.
Tow bar with screw fixation. Tow bar constructed accordingly all European and car producer standards. Installs accordingly car producer mounting places. Kit contains all necessary parts for installation. ATTENTION !!! Electro installation kit not included.
VERTICAL DETACHABLE TOWBAR Mounting of the detachable towbar
A. Before installing the detachable towball you must be sure it is in the `set` position. This can be seen from the color in the indicator window of the operation handle: this should be `red`. If this is not the case then push in the operation handle firmly to the end and then rotate the Handle - while keeping it pushed in - fully clockwise to its end position. The handle now will remain in this (`set`) position. B. Remove the plastic weather cap and ensure that the housing is clear of any mud, gravel, road debris, i.e. Insert the detachable towbar into housing and move it up until the triangular pins are set into the corresponding recesses (left & right) of the housing. While inserting the detachable towbar into the housing keep your hands away from the operation handle. Next, pull the ball itself towards you while holding the towbar in the above position, i.e. triangular pins resting into their corresponding recesses (left/right) in the housing. The system then will automatically lock and the operation handle will turn to indication green and will also pop out about 5 mm. CHECK THIS ! Always check the indicator window in the operation handle shows`green` every time before you start towing. If this is not the case, remove the towbar and start the mounting process again at point `A`. C. The key operated lock is an anti theft device only. It is not involved with safe attachment Of the detachable towbar. It is safe to tow with the key operated lock unlocked as long as the towbar is correctly attached as described above. D. Lock the towball by turning the key clockwise half a turn. Remove the key, after this the operation handle can no longer be pushed in and not be turned enough to activate the mechanism. If the towbar can be locked this also confirms that the towbar is correctly installed. It is essential that the indicator in the handle shows `green` prior to towing. Remember to remove the key from the lock before starting your journey. The towbar is then ready to be used.
Removal of the detachable towbar system. A. Always remove/unhitch the trailer prior to removing the towball, and remove any accessories if they obstruct the locking system as well as detaching the safety cable. B. Unlock the towball by turning the key anti-clockwise half a turn. C. Hold the detachable towball with the left hand. Push the operation handle fully inwards and then whilst holding it pushed in turn the handle fully clockwise to its end position. The handle will remain in this position. D. Let the detachable towball slide out of the housing while holding it in your hand to prevent it from falling onto the floor. E. After removal of the towball the plastic weather cap should be attached to the housing. F. When not in use keep the towball in safe, clean and dry place. If kept in the vehicle this must be located such that it is not free to enter the passenger compartment in the event of heavy braking, heavy cornering or in case of an accident.
Quickly demountable tow bar - removable horizontally. Fast and comfortable detachment with metal handle. Tow bar constructed accordingly all European and car producer standards. Installs accordingly car producer mounting places. Kit contains all necessary parts for installation. ATTENTION !!! Electro installation kit not included.
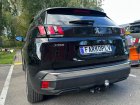
Auto sakabes āķis CITROEN C 5 AIRCROSS,PEUGEOT 3008
The towbar is original, designed for a specific model. -Included is everything necessary for installation Options for electrical installation - 12500637 - 7 PIN - oriģinal, 01.2019 > - 21500637 - 13 PIN - oriģinal, 01.2019 > - 737477 - 7 PIN - oriģinal, 01.2019 > - 747112 - 13 PIN - oriģinal, 01.2019 > - 737478 - 7 PIN - oriģinal, 01.2019> - 747113 - 13 PIN - oriģinal, 01.2019> - MP2D1 - 7 PIN - universal. - MPWH3S-G13 - 13 PIN universal.
Tow bar with screw fixation. Tow bar constructed accordingly all European and car producer standards. Installs accordingly car producer mounting places. Kit contains all necessary parts for installation. ATTENTION !!! Electro installation kit not included.
VERTICAL DETACHABLE TOWBAR Mounting of the detachable towbar
A. Before installing the detachable towball you must be sure it is in the `set` position. This can be seen from the color in the indicator window of the operation handle: this should be `red`. If this is not the case then push in the operation handle firmly to the end and then rotate the Handle - while keeping it pushed in - fully clockwise to its end position. The handle now will remain in this (`set`) position. B. Remove the plastic weather cap and ensure that the housing is clear of any mud, gravel, road debris, i.e. Insert the detachable towbar into housing and move it up until the triangular pins are set into the corresponding recesses (left & right) of the housing. While inserting the detachable towbar into the housing keep your hands away from the operation handle. Next, pull the ball itself towards you while holding the towbar in the above position, i.e. triangular pins resting into their corresponding recesses (left/right) in the housing. The system then will automatically lock and the operation handle will turn to indication green and will also pop out about 5 mm. CHECK THIS ! Always check the indicator window in the operation handle shows`green` every time before you start towing. If this is not the case, remove the towbar and start the mounting process again at point `A`. C. The key operated lock is an anti theft device only. It is not involved with safe attachment Of the detachable towbar. It is safe to tow with the key operated lock unlocked as long as the towbar is correctly attached as described above. D. Lock the towball by turning the key clockwise half a turn. Remove the key, after this the operation handle can no longer be pushed in and not be turned enough to activate the mechanism. If the towbar can be locked this also confirms that the towbar is correctly installed. It is essential that the indicator in the handle shows `green` prior to towing. Remember to remove the key from the lock before starting your journey. The towbar is then ready to be used.
Removal of the detachable towbar system. A. Always remove/unhitch the trailer prior to removing the towball, and remove any accessories if they obstruct the locking system as well as detaching the safety cable. B. Unlock the towball by turning the key anti-clockwise half a turn. C. Hold the detachable towball with the left hand. Push the operation handle fully inwards and then whilst holding it pushed in turn the handle fully clockwise to its end position. The handle will remain in this position. D. Let the detachable towball slide out of the housing while holding it in your hand to prevent it from falling onto the floor. E. After removal of the towball the plastic weather cap should be attached to the housing. F. When not in use keep the towball in safe, clean and dry place. If kept in the vehicle this must be located such that it is not free to enter the passenger compartment in the event of heavy braking, heavy cornering or in case of an accident.
Quickly demountable tow bar - removable horizontally. Fast and comfortable detachment with metal handle. Tow bar constructed accordingly all European and car producer standards. Installs accordingly car producer mounting places. Kit contains all necessary parts for installation. ATTENTION !!! Electro installation kit not included.
Tow bar with screw fixation. Tow bar constructed accordingly all European and car producer standards. Installs accordingly car producer mounting places. Kit contains all necessary parts for installation. ATTENTION !!! Electro installation kit not included.
Tow bar with screw fixation. Tow bar constructed accordingly all European and car producer standards. Installs accordingly car producer mounting places. Kit contains all necessary parts for installation. ATTENTION !!! Electro installation kit not included.
VERTICAL DETACHABLE TOWBAR Mounting of the detachable towbar
A. Before installing the detachable towball you must be sure it is in the `set` position. This can be seen from the color in the indicator window of the operation handle: this should be `red`. If this is not the case then push in the operation handle firmly to the end and then rotate the Handle - while keeping it pushed in - fully clockwise to its end position. The handle now will remain in this (`set`) position. B. Remove the plastic weather cap and ensure that the housing is clear of any mud, gravel, road debris, i.e. Insert the detachable towbar into housing and move it up until the triangular pins are set into the corresponding recesses (left & right) of the housing. While inserting the detachable towbar into the housing keep your hands away from the operation handle. Next, pull the ball itself towards you while holding the towbar in the above position, i.e. triangular pins resting into their corresponding recesses (left/right) in the housing. The system then will automatically lock and the operation handle will turn to indication green and will also pop out about 5 mm. CHECK THIS ! Always check the indicator window in the operation handle shows`green` every time before you start towing. If this is not the case, remove the towbar and start the mounting process again at point `A`. C. The key operated lock is an anti theft device only. It is not involved with safe attachment Of the detachable towbar. It is safe to tow with the key operated lock unlocked as long as the towbar is correctly attached as described above. D. Lock the towball by turning the key clockwise half a turn. Remove the key, after this the operation handle can no longer be pushed in and not be turned enough to activate the mechanism. If the towbar can be locked this also confirms that the towbar is correctly installed. It is essential that the indicator in the handle shows `green` prior to towing. Remember to remove the key from the lock before starting your journey. The towbar is then ready to be used.
Removal of the detachable towbar system. A. Always remove/unhitch the trailer prior to removing the towball, and remove any accessories if they obstruct the locking system as well as detaching the safety cable. B. Unlock the towball by turning the key anti-clockwise half a turn. C. Hold the detachable towball with the left hand. Push the operation handle fully inwards and then whilst holding it pushed in turn the handle fully clockwise to its end position. The handle will remain in this position. D. Let the detachable towball slide out of the housing while holding it in your hand to prevent it from falling onto the floor. E. After removal of the towball the plastic weather cap should be attached to the housing. F. When not in use keep the towball in safe, clean and dry place. If kept in the vehicle this must be located such that it is not free to enter the passenger compartment in the event of heavy braking, heavy cornering or in case of an accident.
Quickly demountable tow bar - removable horizontally. Fast and comfortable detachment with metal handle. Tow bar constructed accordingly all European and car producer standards. Installs accordingly car producer mounting places. Kit contains all necessary parts for installation. ATTENTION !!! Electro installation kit not included.
Tow bar with screw fixation. Tow bar constructed accordingly all European and car producer standards. Installs accordingly car producer mounting places. Kit contains all necessary parts for installation. ATTENTION !!! Electro installation kit not included.
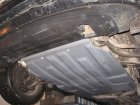
Engine protection. Made of composite material using the most modern technologies. Ensures the safety of the engine and its units for any shocks. Fully protects the engine compartment from moisture, salt, snow and dirt. Unlike metal protections, it absorbs well the impact and at the same time does not receive residual plastic deformations (dents), which subsequently will inevitably lead to damage to the engine or its units. Protection is attached only to the supporting elements - side members, front and rear beam.
Fastening elements of protection are also fuses. With a strong dynamic impact, exceeding the strength of the side members, the protection comes unfastened and remains on the obstacle, while protecting the entire bottom of the vehicle from above above the vehicle protection from damage. In this case, the protection itself in such cases is destroyed very rarely. As a rule, it is put back using new fastening elements. These fasteners also perform another very important task - they ensure the requirements of passive safety according to the EURO NCAP norms. With a strong frontal impact protection is detachable and allows the engine to freely go under the vehicle interior.