
Bike carrier
06.05.2026 Read more >

SIA ML-SERVISS Maskavas ielas fil.
Address: Mazjumpravas street 66, Riga, Latvia, LV-1063
Phone: (+371) 66116670
(+371) 29212095
Email: info@mlserviss.lv
WhatsApp (+371) 29212095
SIA ML-SERVISS filiāle "Jugla"
Address: Brivibas gatve street 422, Riga, Latvia, LV-1024
Phone: (+371) 29522111
Email: brivibas@mlserviss.lv
| Product | Code | Price | Number | |
Dubļu aizsargi (kompl) LEXUS RXMud flaps for car model LEXUS RX (2003-2009), 4 pcs./set. Stock: 0 pcs. 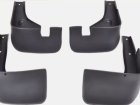 |
BLXRX0421 |
Price: 60.00 € |
|
|
Paklājs bagāžniekā Chevrolet CRUZEApproximate product dimensions (cm): 107 x 104 Stock: 0 pcs.  |
BP102722R |
Price: 35.00 € |
|
|
Jumta reliņiRoof rails fit the following car models: Stock: > 1 pcs. 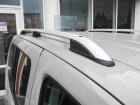 |
R OPCO.73.0003 |
Price: 185.00 € |
|
|
Precision Trimming Knife SetStock: > 1 pcs. 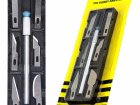 |
AG607A |
Price: 3.00 € |
|
|
SafeStock: > 1 pcs.  |
AG613A |
Price: 12.00 € |
|
|
Mobile phone holderStock: > 1 pcs.  |
AP27 |
Price: 9.00 € |
|
|
Heater, defroster, fanStock: > 1 pcs.  |
DA314 |
Price: 12.00 € |
|
|
Rear View Camera with monitorStock: > 1 pcs.  |
AK307 |
Price: 65.00 € |
|
|
Kravas kastes blīvgumijaProtect the body of your VW Amarok with the reinforced tailgate seal. This accessory reliably prevents moisture, dust and dirt from penetrating, thanks to the use of high-quality materials with a reinforced layer that is resistant to wear and impact. Stock: > 1 pcs. 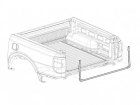 |
400136 |
Price: 189.00 € |
|
|
Oriģinālie vadi piekabes āķimOriginal tow bar wiring kit, with 13 pin socket. Stock: > 1 pcs. 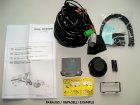 |
21500762 |
Price: 258.00 € |
|
|
Vējsargi SUZUKI JIMNYWind deflectors HEKO for side doors are an important element of car accessories. They enable natural exchange of air inside the vehicle. They prevent windows from fogging on rainy days, since they allow ventilation of the car interior. When the window is open, wind deflectors protect the driver against the direct impact of gushes of wind. They decrease dirt on side windows, enabling better view in wing mirrors. They make it possible to open windows even during heavy rain or snow. They highlight the style line of the vehicle. The picture presented here shows an example of fitted side wind deflector. Heko is the leading Polish producer of wind deflectors for passenger cars, buses. Stock: 0 pcs.  |
PH28662 |
Price: 40.00 € |
|
|
Vējsargi SUZUKI JIMNYWind deflectors HEKO for side doors are an important element of car accessories. They enable natural exchange of air inside the vehicle. They prevent windows from fogging on rainy days, since they allow ventilation of the car interior. When the window is open, wind deflectors protect the driver against the direct impact of gushes of wind. They decrease dirt on side windows, enabling better view in wing mirrors. They make it possible to open windows even during heavy rain or snow. They highlight the style line of the vehicle. The picture presented here shows an example of fitted side wind deflector. Heko is the leading Polish producer of wind deflectors for passenger cars, buses. Stock: 0 pcs.  |
PH28663+ |
Price: 53.00 € |
|
|
Vējsargi RENAULT 4 E-TechWind deflectors HEKO for side doors are an important element of car accessories. They enable natural exchange of air inside the vehicle. They prevent windows from fogging on rainy days, since they allow ventilation of the car interior. When the window is open, wind deflectors protect the driver against the direct impact of gushes of wind. They decrease dirt on side windows, enabling better view in wing mirrors. They make it possible to open windows even during heavy rain or snow. They highlight the style line of the vehicle. The picture presented here shows an example of fitted side wind deflector. Heko is the leading Polish producer of wind deflectors for passenger cars, buses. Stock: 0 pcs.  |
PH27037 |
Price: 40.00 € |
|
|
Papildlukturis LED komplektsCustomized Vehicle Integration Kit for Lazer LED Spotlight Installation Stock: 0 pcs.  |
LAZER GK-HILUX-ELITE-G2-6K |
Price: 779.00 € |
|
|
Vējsargi RENAULT 4 E-TechWind deflectors HEKO for side doors are an important element of car accessories. They enable natural exchange of air inside the vehicle. They prevent windows from fogging on rainy days, since they allow ventilation of the car interior. When the window is open, wind deflectors protect the driver against the direct impact of gushes of wind. They decrease dirt on side windows, enabling better view in wing mirrors. They make it possible to open windows even during heavy rain or snow. They highlight the style line of the vehicle. The picture presented here shows an example of fitted side wind deflector. Heko is the leading Polish producer of wind deflectors for passenger cars, buses. Stock: 0 pcs.  |
PH27038+ |
Price: 53.00 € |
|
|
Rezerves ritenisCompact spare wheel RR165/80 R17 5x114.3x60.1 Stock: 0 pcs. 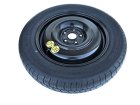 |
RR165/80 R17 5x114.3x60.1 |
Price: 210.00 € |
|
|
Aizsargstienis DODGE RAM 1500Code RAM1500-L1976-05-B BLACK Stock: 0 pcs.  |
RAM1500-L1976-05-B |
Price: 323.00 € |
|
|
CimdiMercator GoGrip Nitrile Gloves, Size L. Stock: > 1 pcs.  |
MER20336 |
Price: 10.00 € |
|
|
CimdiMercator GoGrip Nitrile Gloves, Size M. Stock: 0 pcs.  |
MER20335 |
Price: 10.00 € |
|
|
Diagnostikas skenerisDiagnostic Scanner ELM327 OBD2 BT PIC25K80 DC24K. Stock: 0 pcs. 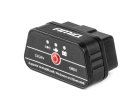 |
04731 |
Price: 20.00 € |
|
|
