Informācija par sīkdatņu izmantošanu.
Šī vietne izmanto sīkdatnes, lai uzlabotu lietošanas pieredzi un optimizētu tās darbību.
Turpinot lietot šo mājas lapu, Jūs piekrītiet sīkdatņu lietošanai SIA ML-SERVISS tīmekļa vietnē.
Lasīt vairāk
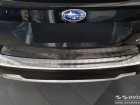
Do you often ship purchases, baggage, building materials, or travel with a dog? ✔️ Cover for the paint of the rear bumper (mechanical damage, scratches, abrasions, chips). Is the rear bumper broken or damaged? ✔️ Ability to cover a damaged item. The car is not a garage? Frequent visits to a car wash? ✔️ Protection against external factors (moisture, road salt, car wash products, etc.). Want to enhance or highlight the look of your car? ✔️ Gives the car an exclusive character and unique appearance. The rear bumper trim Avisa is the perfect solution for your car, as it has both protective functions and looks great as a decorative element. Resistant to weather conditions (temperature -40 ° С / + 50 ° С) and visits to a car wash (moisture). This is not a typical chrome strip because it is made of polished stainless steel. Thanks to cleaning, its surface scales perfectly between hard chrome and a deep matte layer. The bent edge of the bumper is also closed in the cover plate through a specially profiled bend. It is fixed using a double-sided tape, which is located on all four edges of the plank. Attention! The product must be glued carefully, since it is impossible to repeat the installation after a single fixation. After installing the lining, you can easily load and remove luggage, and the scratched item now covers an exclusive accessory. You will receive the case in a sturdy packaging with assembly instructions 'Step by Step'. and 3M degreasing material. The kit also includes a tube Autosol (5 ml) - polishing and updating stainless steel. The excellent formula of the preparation provides a steel surface with a long-lasting gloss without scratches and a strong protective layer.
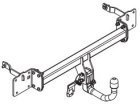
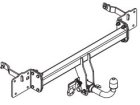
Aizsargstienis Peugeot Expert / Citroen Jumpy / Toyota Proace
Eurobar Peugeot Expert / Citroen Jumpy / Toyota Proace 2024- Product Weight kg - 6.9 Material - AISI304 Material main dimension mm 60 Surface treatment - Polished Compatible with radar - Compatible with radar. Compatible with parking sensors - Not comaptible with parking sensors in the middle. Compatible with camera - No data. Compatible with towing eye - Compatible with towing unit.
Tow bar with screw fixation. Tow bar constructed accordingly all European and car producer standards. Installs accordingly car producer mounting places. Kit contains all necessary parts for installation. ATTENTION !!! Electro installation kit not included.
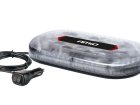
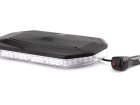
High intensity MAGNETIC mount MINI LIGHT BAR WLB78 293x171mm R65 R10 48LED 12/24V IP56 Product Description LED warning bar, orange light, equipped with 48 super bright SMD LEDs. The light beam is visible even on a sunny day. ECE R65, ECE R10 approved. Description: Homologation: ECE R65,ECE R10 48 super bright LED diodes Magnetic fixation DC: 12~24V Meets IP56 protection standards Temperatura range: -30°C - + 50°C Connection: cigarette lighter socket Dimensions: 293 mm x 171 mm x 46 (36) mm
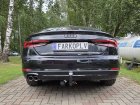
Audi A4 (2016- ) Audi A4 Avant (2016- ) Audi A4 AllRoad (2016- ) Audi A5 Coupé (2016- ) Audi A5 Sportback (2017- ) VERTICAL DETACHABLE TOWBAR Mounting of the detachable towbar
A. Before installing the detachable towball you must be sure it is in the `set` position. This can be seen from the color in the indicator window of the operation handle: this should be `red`. If this is not the case then push in the operation handle firmly to the end and then rotate the Handle - while keeping it pushed in - fully clockwise to its end position. The handle now will remain in this (`set`) position. B. Remove the plastic weather cap and ensure that the housing is clear of any mud, gravel, road debris, i.e. Insert the detachable towbar into housing and move it up until the triangular pins are set into the corresponding recesses (left & right) of the housing. While inserting the detachable towbar into the housing keep your hands away from the operation handle. Next, pull the ball itself towards you while holding the towbar in the above position, i.e. triangular pins resting into their corresponding recesses (left/right) in the housing. The system then will automatically lock and the operation handle will turn to indication green and will also pop out about 5 mm. CHECK THIS ! Always check the indicator window in the operation handle shows`green` every time before you start towing. If this is not the case, remove the towbar and start the mounting process again at point `A`. C. The key operated lock is an anti theft device only. It is not involved with safe attachment Of the detachable towbar. It is safe to tow with the key operated lock unlocked as long as the towbar is correctly attached as described above. D. Lock the towball by turning the key clockwise half a turn. Remove the key, after this the operation handle can no longer be pushed in and not be turned enough to activate the mechanism. If the towbar can be locked this also confirms that the towbar is correctly installed. It is essential that the indicator in the handle shows `green` prior to towing. Remember to remove the key from the lock before starting your journey. The towbar is then ready to be used.
Removal of the detachable towbar system. A. Always remove/unhitch the trailer prior to removing the towball, and remove any accessories if they obstruct the locking system as well as detaching the safety cable. B. Unlock the towball by turning the key anti-clockwise half a turn. C. Hold the detachable towball with the left hand. Push the operation handle fully inwards and then whilst holding it pushed in turn the handle fully clockwise to its end position. The handle will remain in this position. D. Let the detachable towball slide out of the housing while holding it in your hand to prevent it from falling onto the floor. E. After removal of the towball the plastic weather cap should be attached to the housing. F. When not in use keep the towball in safe, clean and dry place. If kept in the vehicle this must be located such that it is not free to enter the passenger compartment in the event of heavy braking, heavy cornering or in case of an accident.
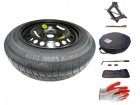
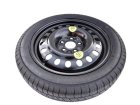
Compact spare wheel and tool kit, RR155/90 R18 5x114.3x60.1 kpl - Size: 155/90 R18 - Bolt spacing: 5 x 114.3mm x 60.1mm The kit includes: -Compact spare wheel 155/90 R18 - Trapezoidal jack with ratchet mechanism. - Wheel wrench with 2 sockets. - A case for storage of a jack and a wheel key. - Spare wheel cover. - Protective gloves.
High intensity MAGNETIC mount MINI LIGHT BAR WLB78 293x171mm R65 R10 48LED 12/24V IP56 Product Description LED warning bar, orange light, equipped with 48 super bright SMD LEDs. The light beam is visible even on a sunny day. ECE R65, ECE R10 approved.
Description:
Homologation: ECE R65,ECE R10 48 super bright LED diodes Magnetic fixation DC: 12~24V Meets IP56 protection standards Temperatura range: -30°C - + 50°C Connection: cigarette lighter socket Dimensions: 293 mm x 171 mm x 46 (36) mm
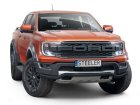
Front guard bar (stainless steel) - diameter - 70 mm. -weight- 8 kg. This product has a European certificate, is approved for use on public roads, and does not require removal during technical inspection.
Front guard bar blac color - diameter - 70 mm. -weight- 13 kg. This product has a European certificate, is approved for use on public roads, and does not require removal during technical inspection.
VERTICAL DETACHABLE TOWBAR Opel Grandland 2024- Mounting of the detachable towbar
A. Before installing the detachable towball you must be sure it is in the `set` position. This can be seen from the color in the indicator window of the operation handle: this should be `red`. If this is not the case then push in the operation handle firmly to the end and then rotate the Handle - while keeping it pushed in - fully clockwise to its end position. The handle now will remain in this (`set`) position. B. Remove the plastic weather cap and ensure that the housing is clear of any mud, gravel, road debris, i.e. Insert the detachable towbar into housing and move it up until the triangular pins are set into the corresponding recesses (left & right) of the housing. While inserting the detachable towbar into the housing keep your hands away from the operation handle. Next, pull the ball itself towards you while holding the towbar in the above position, i.e. triangular pins resting into their corresponding recesses (left/right) in the housing. The system then will automatically lock and the operation handle will turn to indication green and will also pop out about 5 mm. CHECK THIS ! Always check the indicator window in the operation handle shows`green` every time before you start towing. If this is not the case, remove the towbar and start the mounting process again at point `A`. C. The key operated lock is an anti theft device only. It is not involved with safe attachment Of the detachable towbar. It is safe to tow with the key operated lock unlocked as long as the towbar is correctly attached as described above. D. Lock the towball by turning the key clockwise half a turn. Remove the key, after this the operation handle can no longer be pushed in and not be turned enough to activate the mechanism. If the towbar can be locked this also confirms that the towbar is correctly installed. It is essential that the indicator in the handle shows `green` prior to towing. Remember to remove the key from the lock before starting your journey. The towbar is then ready to be used.
Removal of the detachable towbar system. A. Always remove/unhitch the trailer prior to removing the towball, and remove any accessories if they obstruct the locking system as well as detaching the safety cable. B. Unlock the towball by turning the key anti-clockwise half a turn. C. Hold the detachable towball with the left hand. Push the operation handle fully inwards and then whilst holding it pushed in turn the handle fully clockwise to its end position. The handle will remain in this position. D. Let the detachable towball slide out of the housing while holding it in your hand to prevent it from falling onto the floor. E. After removal of the towball the plastic weather cap should be attached to the housing. F. When not in use keep the towball in safe, clean and dry place. If kept in the vehicle this must be located such that it is not free to enter the passenger compartment in the event of heavy braking, heavy cornering or in case of an accident.
Semi-automatic towbar Opel Grandland 2024- Mechanism with quickly demountable ending
Body install: 1. Fix body of the mechanism to brackets by bolts M12x25mm.
Ball fastening: 1. To install the ball in mechanism push the lever down till resistance. 2. Slip the ball into body in this way so pins if the ball will be in nests of the body. 3. Let go the lever. It should return to initial position, this means correctly installed ball in the mechanism. 4. Put safety pin through lever's hole and bracket's hole. Correctly placed safety pin.
Ball unfastening: 1.To unfasten the ball take out the safety pin. 2.Push the lever down till resistance. 3.With fast move take out the ball. Let go the lever. It should return to initial position. 4.Put plug into the body. Plugs are in accessories of the towbar with quickly demountable ending.
Kartera aizsargs FORD GALAXY / SEAT ALHAMBRA / VW SHARAN
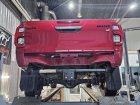
Crankcase protection – protection of the engine compartment. The crankcase protection is attached to its original place, protecting the engine compartment from the damage, road dust, etc. Made from fairly durable and flexible HDPE material. Made for specific car model: FORD GALAXY I (WGR) 1995 - 2006 petrol, engines: 2.0 (85kW), 2.3 (103kW, 107kW), 2.8 (128kW, 150kW), diesel, engine: 1.9 (66kW, 81kW, 85kW, 96kW, 110kW)
Crankcase protection – protection of the engine compartment. The crankcase protection is attached to its original place, protecting the engine compartment from the damage, road dust, etc. Made from fairly durable and flexible HDPE material. Made for specific car model: FORD GALAXY II (WA6) 2006 - 2015 petrol, engines: 1.6 (118kW), 2.0 (107kW, 146kW, 149kW), 2.3 (118kW), diesel, engines: 1.6 (85kW), 1.8 (74kW, 92kW), 2.0 (85kW, 96kW, 100kW, 103kW, 120kW), 2.2 (129kW, 147kW)
Crankcase protection – protection of the engine compartment. The crankcase protection is attached to its original place, protecting the engine compartment from the damage, road dust, etc. Made from fairly durable and flexible HDPE material. Made for specific car model: RENAULT KANGOO I 1997 - 2010 petrol, engines: 1.0 (43kW), 1.2 (43kW, 55kW), 1.4 (55kW), 1.6 (66kW, 70kW), petrol LPG, engine: 1.2 (44kW), diesel, engines: 1.5 (42kW, 45kW, 48kW, 50kW, 60kW, 62kW), 1.9 (40kW, 47kW, 59kW, 62kW)
Crankcase protection – protection of the engine compartment. The crankcase protection is attached to its original place, protecting the engine compartment from the damage, road dust, etc. Made from fairly durable and flexible HDPE material. Made for specific car model: CITROEN C5 II (RD) 2008 - 2017 petrol, engines: 1.6 (88kW, 110kW, 115kW), 1.8 (92kW), 2.0 (103kW), 3.0 (155kW), diesel, engines: 1.6 (80kW, 82kW, 84kW), 2.0 (100kW, 103kW, 110kW, 120kW, 133kW), 2.2 (120kW, 125kW, 150kW), 2.7 (150kW), 3.0 (177kW)