Aizmugures lukturis LED
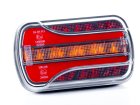
FT-350 LED
3-functional rear light. Can be installed on either the right or left side of the trailer.
- 1 m long cable.
- NEON side light.
- brake light.
- direction indicator.
Small, thin and compact design is ideal for all types of passenger cars and agricultural trailers.
Installation is possible both vertically and horizontally.
Despite its small size, the product provides high lighting power. The supply voltage range is 12-36V.
The FT-350 LED light has the highest degree of protection against water, dust, dirt and impacts - IP 69.
It has European approval E9 and an EMC electromagnetic compatibility certificate.
Dimensions 120x70x30.
Stock:
> 1 pcs.
|
|
|
|
|
Aizmugures lukturis LED
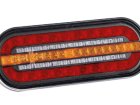
FT-320 LED DI BAJONET
Universal LED rear lamp, 12/24V, dynamic indicator with a bayonet connector, smoked lampshade, bajonet connector. Can be installed on either the left or right side of the trailer.
The series of compact, modern rear lamps has been equipped with 3 functions:
– STOP light
– position light
– indicator:
The lamps are shock and mechanical damage resistant – PC lampshade.
The products also have electrical protection against reverse polarity.
Dimensions 195x75x35.
Stock:
> 1 pcs.
|
|
|
|
|
Alumīnija kravas kastes žalūzijas veida vāks Toyota Hilux 2015-2020, 2020+
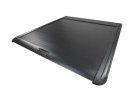
OFD Aluminum Roller Bed Cover – double cab Bed
Protect your cargo in all conditions with OFD’s tough aluminum roller cover. Built for durability, it shields against dust, water, and impact—thanks to a nearly seamless hinge design and powder-coated UV-resistant finish.
The cover locks in 3 positions, includes drain tubes, and installs without drilling. An adjustable roller mechanism lets you control opening speed, while a handy strap makes closing easy.
Specs:
Fits double cab beds,
Lockable with key,
Aluminum, black povder-coated,
Includes drain tubes, hardware, oil.
Stock:
0 pcs.
|
|
|
|
|
Alumīnija kravas kastes žalūzijas veida vāks Dodge Ram 1500 2009-2019
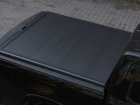
OFD Aluminum Roller Bed Cover – 5' 7' Bed
Protect your cargo in all conditions with OFD’s tough aluminum roller cover. Built for durability, it shields against dust, water, and impact—thanks to a nearly seamless hinge design and powder-coated UV-resistant finish.
The cover locks in 3 positions, includes drain tubes, and installs without drilling. An adjustable roller mechanism lets you control opening speed, while a handy strap makes closing easy.
Specs:
Fits 5' 7' beds
Lockable with key
Aluminum, black povder-coated
Includes drain tubes, hardware, oil
Not for Rambox models
Stock:
0 pcs.
|
|
|
|
|
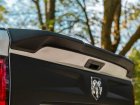
Rear lid spoiler
Stock:
0 pcs.
|
|
|
|
|
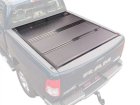
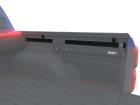
Kravas kastes vāks Dodge RAM
OFD Hard Tri-Fold Bed Cover – 5' 7' Bed.
Keep your gear secure in all conditions with the OFD hard tri-fold bed cover. Built with a 3-panel aluminum design, this rugged cover features a low-profile height under 2 inches, reducing wind resistance and improving fuel efficiency by up to 10%. Each panel includes its own latch for quick access, while 2 integrated drain tubes and a scratch-resistant weather strip offer all-weather protection.
Fits 5' 7' truck beds (approx. 170 cm), and supports up to 300 lbs (136 kg) of evenly distributed weight.
Stock:
0 pcs.
|
|
|
|
|
Elektriskā vinča
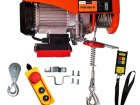
Electric winch PHW800 with remote control
Load capacity - 400 kg.
Load capacity via pulley – 800 kg
Power supply - 220V - 50Hz.
Current - 5.9 A.
The kit includes a remote control and a cable control.
Insulation class - B.
Degree of protection - IP40.
Lifting height - 9/18 m.
Rope diameter - 5.1 mm.
Power 1300 W.
Operating mode -20% 10 min.
Lifting speed - 5/10 m/min.
Weight -19 kg.
The practical PHW800 winch is an electric vertical winch that can be connected to a 230V power supply via a cable, that is, it can be connected to an electrical outlet.
The winch has a very wide range of applications - it is useful for use in warehouses, workshops, mechanical plants, various manufacturing companies, construction sites, garages, as well as households and wherever it is necessary to lift or lower objects.
The durable body of the winch and elements made of steel allow it to be widely used and extend its service life.
It is equipped with the best quality electric motor that ensures smooth and trouble-free operation of the device.
Motor with rotor design in one axis with cooling and braking system effectively reflects the efficiency of the drive system in the most difficult working conditions, making the winch reliable.
A wireless remote control (if included) allows you to control the winch without additional cables, making work easier.
It is equipped with an additional steel cable that protects the cable from breaking. The emergency switch allows you to stop the device at any time.
Stock:
> 1 pcs.
 |
|
|
|
|
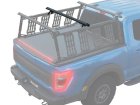
Regulējama Tessera plauktu sistēma
Extra Aluminum cross bar (piece) painted in Black Matt for Tessera Tower+ Telescopic Rack System code TOW 001
Stock:
> 1 pcs.
|
|
|
|
|
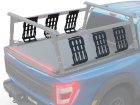
Regulējama Tessera plauktu sistēma
Stylish Telescopic Side Panels Painted in Black Matt (Pair) for Tessera Tower+ Telescopic Rack System code TOW 001
Set of 2 pieces
Stock:
> 1 pcs.
|
|
|
|
|
Kravas kastes organaizeris
Elevate the versatility of your pickup truck with the Tessera Extra C-Channel System, designed exclusively for the Tessera Divider+ (DIV 001 - code) when paired with Tessera Roll+ and Tessera SE Series.
This innovative addition ensures seamless installation and enhanced functionality, even for trucks without factory-installed C-channels.
Premium Black Matt Powder Coating – Unmatched Durability and Style
Finished with PP 600 Ammos fine-textured powder coating, this Black Matt finish is built to last, offering:
• Exceptional Durability: Resistant to weather, corrosion, and the challenges of off-road use.
• Certified Quality: Approved by QUALICOAT (Class 2 - Category 1, Approval #P-0780) and compliant with ISO 9001:2015 (Quality Management) and ISO 14001:2015 (Environmental Management).
• Precise Application: Coating applied at 60-100 microns using advanced electrostatic or trio-charging spray technology for full coverage and consistent color.
• Heat-Cured Resilience: Cured at 190°C, ensuring superior adhesion and long-lasting performance.
Seamless Integration for Maximum Functionality
Designed to complement the Tessera Divider+, this extra C-Channel System transforms your truck bed into a highly efficient space for secure cargo management and storage, even without factory-installed channels. Whether for work or adventure, its premium finish and robust construction ensure it will withstand daily use and extreme conditions.
Why Choose the Tessera Extra C-Channel System?
• Exclusive Compatibility: Works only with Tessera Roll+ and SE Series for optimal performance.
• All-Size Fit: Accommodates various bed sizes for both European and U.S. truck models.
• Superior Finish: Black Matt coating adds a sleek, modern aesthetic while ensuring long-lasting durability.
• Certified Excellence: Meets the highest standards of quality and environmental responsibility.
Stock:
0 pcs.
 |
|
|
|
|
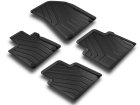
Paklāji salonā gumijas Opel Astra L Tourer Hybrid
Opel Astra L Tourer Hybrid, 2021-
The carpets of the SPART line are made of an innovative TPE mixture, which is characterized by excellent wear resistance parameters and excellent durability.
The modern and stylish design guarantees their excellent visual appearance inside the vehicle, while giving a new quality during their use.
Intended for the specific car model, the mats are 100% adapted to the shape of the car floor, also taking into account the fasteners and their location, if the specific car model has them.
FUNCTIONALITY
The optimally raised side edge and ergonomic shape prevent water, sand, snow and other dirt from escaping from the carpet, effectively protecting the car upholstery against dirt.
The material from which the carpets are made is resistant to the effects of fatty acids (such as oil) and chemicals.
Thanks to the use of the highest quality mixture, the carpets will serve well in all weather conditions (very low and high temperatures, high humidity, high resistance to mechanical damage).
A specially lowered edge at the front of the driver's mat ensures safe use of the gas, clutch and brake pedals.
SAFETY AND QUALITY
Precise adaptation of the shape to the floor of the particular car and the special structure of the lower surface ensure that the carpets do not move while driving.
Thanks to the use of energy-saving production technology and 100% recyclable material, the product is safe for health and environmentally friendly.
The carpets are manufactured in Poland according to EU standards.
The products are covered by a 2-year warranty.
CLEANING AND MAINTENANCE
Carpets can be cleaned with commonly available detergents under running water or using a pressure washer.
Stock:
0 pcs.
 |
|
|
|
|
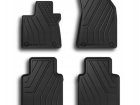
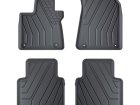
Paklāji salonā gumijas MG ZS
MG ZS Hybrid 2024-
The carpets of the SPART line are made of an innovative TPE mixture, which is characterized by excellent wear resistance parameters and excellent durability.
The modern and stylish design guarantees their excellent visual appearance inside the vehicle, while giving a new quality during their use.
Intended for the specific car model, the mats are 100% adapted to the shape of the car floor, also taking into account the fasteners and their location, if the specific car model has them.
FUNCTIONALITY
The optimally raised side edge and ergonomic shape prevent water, sand, snow and other dirt from escaping from the carpet, effectively protecting the car upholstery against dirt.
The material from which the carpets are made is resistant to the effects of fatty acids (such as oil) and chemicals.
Thanks to the use of the highest quality mixture, the carpets will serve well in all weather conditions (very low and high temperatures, high humidity, high resistance to mechanical damage).
A specially lowered edge at the front of the driver's mat ensures safe use of the gas, clutch and brake pedals.
SAFETY AND QUALITY
Precise adaptation of the shape to the floor of the particular car and the special structure of the lower surface ensure that the carpets do not move while driving.
Thanks to the use of energy-saving production technology and 100% recyclable material, the product is safe for health and environmentally friendly.
The carpets are manufactured in Poland according to EU standards.
The products are covered by a 2-year warranty.
CLEANING AND MAINTENANCE
Carpets can be cleaned with commonly available detergents under running water or using a pressure washer.
Stock:
0 pcs.
 |
|
|
|
|
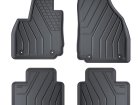
Paklāji salonā gumijas MG HS
MG HS PHEV 2024-
The carpets of the SPART line are made of an innovative TPE mixture, which is characterized by excellent wear resistance parameters and excellent durability.
The modern and stylish design guarantees their excellent visual appearance inside the vehicle, while giving a new quality during their use.
Intended for the specific car model, the mats are 100% adapted to the shape of the car floor, also taking into account the fasteners and their location, if the specific car model has them.
FUNCTIONALITY
The optimally raised side edge and ergonomic shape prevent water, sand, snow and other dirt from escaping from the carpet, effectively protecting the car upholstery against dirt.
The material from which the carpets are made is resistant to the effects of fatty acids (such as oil) and chemicals.
Thanks to the use of the highest quality mixture, the carpets will serve well in all weather conditions (very low and high temperatures, high humidity, high resistance to mechanical damage).
A specially lowered edge at the front of the driver's mat ensures safe use of the gas, clutch and brake pedals.
SAFETY AND QUALITY
Precise adaptation of the shape to the floor of the particular car and the special structure of the lower surface ensure that the carpets do not move while driving.
Thanks to the use of energy-saving production technology and 100% recyclable material, the product is safe for health and environmentally friendly.
The carpets are manufactured in Poland according to EU standards.
The products are covered by a 2-year warranty.
CLEANING AND MAINTENANCE
Carpets can be cleaned with commonly available detergents under running water or using a pressure washer.
Stock:
0 pcs.
 |
|
|
|
|
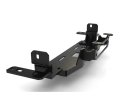
Vinčas platforma
WMAmarok23-ACC - hidden winch mounting plate Standard with ACC.
Allows the winch to be solidly mounted up to 12500lbs(5510 kg) fully under the factory bumper.
No welding or drilling required for installation, bolts into factory holes in the vehicle frame.
Engine version 2.8 3.6 3.8
Stock:
> 1 pcs.
|
|
|
|
|
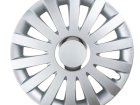
Kalpaki dekoratīvie
Decorative wheel caps.
- 16, color silver.
The set includes 4 pcs.
Stock:
> 1 pcs.
|
|
|
|
|
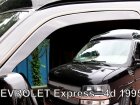
Wind deflectors CHEVROLET EXPRESS
Wind deflectors HEKO for side doors are an important element of car accessories. They enable natural exchange of air inside the vehicle. They prevent windows from fogging on rainy days, since they allow ventilation of the car interior. When the window is open, wind deflectors protect the driver against the direct impact of gushes of wind. They decrease dirt on side windows, enabling better view in wing mirrors. They make it possible to open windows even during heavy rain or snow. They highlight the style line of the vehicle. The picture presented here shows an example of fitted side wind deflector. Heko is the leading Polish producer of wind deflectors for passenger cars, buses.
Stock:
0 pcs.
|
|
|
|
|
Paklāji salonā gumijas MG HS
MG HS 2024-
The carpets of the SPART line are made of an innovative TPE mixture, which is characterized by excellent wear resistance parameters and excellent durability.
The modern and stylish design guarantees their excellent visual appearance inside the vehicle, while giving a new quality during their use.
Intended for the specific car model, the mats are 100% adapted to the shape of the car floor, also taking into account the fasteners and their location, if the specific car model has them.
FUNCTIONALITY
The optimally raised side edge and ergonomic shape prevent water, sand, snow and other dirt from escaping from the carpet, effectively protecting the car upholstery against dirt.
The material from which the carpets are made is resistant to the effects of fatty acids (such as oil) and chemicals.
Thanks to the use of the highest quality mixture, the carpets will serve well in all weather conditions (very low and high temperatures, high humidity, high resistance to mechanical damage).
A specially lowered edge at the front of the driver's mat ensures safe use of the gas, clutch and brake pedals.
SAFETY AND QUALITY
Precise adaptation of the shape to the floor of the particular car and the special structure of the lower surface ensure that the carpets do not move while driving.
Thanks to the use of energy-saving production technology and 100% recyclable material, the product is safe for health and environmentally friendly.
The carpets are manufactured in Poland according to EU standards.
The products are covered by a 2-year warranty.
CLEANING AND MAINTENANCE
Carpets can be cleaned with commonly available detergents under running water or using a pressure washer.
Stock:
0 pcs.
 |
|
|
|
|
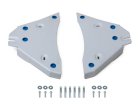
Kartera aizsargs AL
Aluminum A-arm guard 6mm.
Stock:
> 1 pcs.
|
|
|
|
|
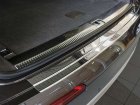
Aizmugures bampera uzlika AUDI Q 7
Do you often ship purchases, baggage, building materials, or travel with a dog?
✔️ Cover for the paint of the rear bumper (mechanical damage, scratches, abrasions, chips).
Is the rear bumper broken or damaged?
✔️ Ability to cover a damaged item.
The car is not a garage? Frequent visits to a car wash?
✔️ Protection against external factors (moisture, road salt, car wash products, etc.).
Want to enhance or highlight the look of your car?
✔️ Gives the car an exclusive character and unique appearance.
The rear bumper trim Avisa is the perfect solution for your car, as it has both protective functions and looks great as a decorative element. Resistant to weather conditions (temperature -40 ° С / + 50 ° С) and visits to a car wash (moisture).
This is not a typical chrome strip because it is made of polished stainless steel. Thanks to cleaning, its surface scales perfectly between hard chrome and a deep matte layer.
The bent edge of the bumper is also closed in the cover plate through a specially profiled bend. It is fixed using a double-sided tape, which is located on all four edges of the plank.
Attention! The product must be glued carefully, since it is impossible to repeat the installation after a single fixation.
After installing the lining, you can easily load and remove luggage, and the scratched item now covers an exclusive accessory.
You will receive the case in a sturdy packaging with assembly instructions 'Step by Step'. and 3M degreasing material. The kit also includes a tube Autosol (5 ml) - polishing and updating stainless steel. The excellent formula of the preparation provides a steel surface with a long-lasting gloss without scratches and a strong protective layer.
Stock:
> 1 pcs.
 |
|
|
|
|
Kit Optiplus
Kit Cruz Optiplus FIX Honda CR-V 2007-2012
Stock:
0 pcs.
Sorry
Image not available
|
|
|
|
|