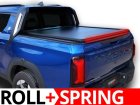
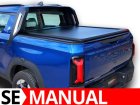
Alumīnija kravas kastes žalūzijas veida vāks SsangYong / KGM Musso EV 2025+
Aluminum roller lid shutter in black matte color. New generation, patented 'Tessera Roll+' aluminum roller lid shutter, revolutionary and futuristic design, versatility, durability, 100% handmade and with 3 years warranty.
With built-in REAR TAIL LIGHT and STOP signal.
Built-in LED strip with a button located inside the running end bar that illuminates the cargo box from the inside.
It is possible to upgrade the existing BASIC set to the SPRING or ELECTRIC version.
Special aluminum side rails (5 mm thick) with built-in 'T-SLOTS' for convenient and safe installation without additional equipment, for example: roof rails or cross bars.
Specially designed internal locking system with aluminum locking guards to prevent unauthorized access. Use the strap to unlock the Tessera Roll+ automatically.
Specially designed wider, stronger slats for 100% load safety and rubber for maximum insulation.
2 specially designed '20' drainage systems with 2 overflow systems and integrated 'ANTI-LEAF' technology, for complete drainage and water protection.
An innovative rear slat design combined with the smallest tank dimensions (26cm x 30cm) offers the advantage of increased capacity in both length and height.
Specially designed tank cover for easy access and control of the Tessera Roll+.
Next generation powder coating (Class 2) with fine texture and high weather resistance.
Simple installation in vehicles with or without bedliner. In the case of Bedliner, it can be easily installed with UNDER-rail or OVER-rail types.
Easy and quick installation without drilling holes.
Aerodynamic design that reduces fuel consumption.
Stock:
0 pcs.
 |
|
|
|
|
Alumīnija kravas kastes žalūzijas veida vāks SsangYong / KGM Musso EV 2025+
Aluminum roller lid shutter in black matte color. New generation, patented 'Tessera Roll+' aluminum roller lid shutter, revolutionary and futuristic design, versatility, durability, 100% handmade and with 3 years warranty.
The spring-assisted version of the Tessera Roll+ offers added convenience, utilizing a heavy-duty spring mechanism for easy operation. This allows users to open and close the cover with significantly less effort compared to the manual version. With the same durable aluminum construction, it offers excellent weather resistance and protection for your cargo. The spring assist ensures smooth retraction, making this an ideal option for those who need frequent access to the truck bed.
With built-in REAR TAIL LIGHT and STOP signal.
Built-in LED strip with a button located inside the running end bar that illuminates the cargo box from the inside.
Special aluminum side rails (5 mm thick) with built-in 'T-SLOTS' for convenient and safe installation without additional equipment, for example: roof rails or cross bars.
Specially designed internal locking system with aluminum locking guards to prevent unauthorized access. Use the strap to unlock the Tessera Roll+ automatically.
Specially designed wider, stronger slats for 100% load safety and rubber for maximum insulation.
2 specially designed '20' drainage systems with 2 overflow systems and integrated 'ANTI-LEAF' technology, for complete drainage and water protection.
An innovative rear slat design combined with the smallest tank dimensions (26cm x 30cm) offers the advantage of increased capacity in both length and height.
Specially designed tank cover for easy access and control of the Tessera Roll+.
Next generation powder coating (Class 2) with fine texture and high weather resistance.
Simple installation in vehicles with or without bedliner. In the case of Bedliner, it can be easily installed with UNDER-rail or OVER-rail types.
Easy and quick installation without drilling holes.
Aerodynamic design that reduces fuel consumption.
Stock:
0 pcs.
 |
|
|
|
|
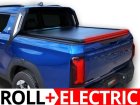
Alumīnija kravas kastes žalūzijas veida vāks SsangYong / KGM Musso EV 2025+
Aluminum roller lid shutter in black matte color. New generation, patented 'Tessera Roll+' aluminum roller lid shutter, revolutionary and futuristic design, versatility, durability, 100% handmade and with 3 years warranty.
A specially designed control unit with the help of artificial intelligence, which does not require calibration for the length of the body of the trunk of each vehicle, because it is done automatically.
Soft Open/Close Function: A specially programmed system that provides a soft open/close function for smoother use. You can stop and lock the blind cover at any time using the stepless automatic locking.
Maintenance Alerts: The blind informs you through the app that the tank drain needs to be cleaned if there is a water blockage inside. As well as when it is necessary to lubricate the rails for smoother use.
Mobile app (iOS and Android).
Obstacle detection function. Tessera Roll+ is able to detect any obstacles (e.g. objects, etc.) thanks to sensors mounted on the rear bar, without using motor current. Achieve more reliable and safer protection, longer engine life and maximum weather performance.
Triple Operating System (Mobile Phone Application, Back Bar 'One Touch' Operation, Key Fob Remote Control).
The motor is tested under the most extreme conditions, mounted and protected in a central aluminum shaft (heavy duty) (direct drive system) and does not take up EXTRA SPACE in the vehicle's cargo compartment.
Specially designed remote control (2 pcs.).
With built-in REAR TAIL LIGHT and STOP signal.
Built-in LED strip with a button located inside the running end bar that illuminates the cargo box from the inside.
Special aluminum side rails (5 mm thick) with built-in 'T-SLOTS' for convenient and safe installation without additional equipment, for example: roof rails or cross bars.
Specially designed internal locking system with aluminum locking guards to prevent unauthorized access. Use the strap to unlock the Tessera Roll+ automatically.
Specially designed wider, stronger slats for 100% load safety and rubber for maximum insulation.
2 specially designed '20' drainage systems with 2 overflow systems and integrated 'ANTI-LEAF' technology, for complete drainage and water protection.
An innovative rear slat design combined with the smallest tank dimensions (26cm x 30cm) offers the advantage of increased capacity in both length and height.
Specially designed tank cover for easy access and control of the Tessera Roll+.
Next generation powder coating (Class 2) with fine texture and high weather resistance.
Simple installation in vehicles with or without bedliner. In the case of Bedliner, it can be easily installed with UNDER-rail or OVER-rail types.
Easy and quick installation without drilling holes.
Aerodynamic design that reduces fuel consumption.
Stock:
0 pcs.
 |
|
|
|
|
Aluminum roller lid shutter SsangYong / KGM Musso EV 2025+
Aluminum roller lid shutter in black matte color. New generation, patented 'Tessera Roll+' aluminum roller lid shutter, revolutionary and futuristic design, versatility, durability, 100% handmade and with 3 years warranty.
Special aluminum side rails (5 mm thick) with built-in 'T-SLOTS' for convenient and safe installation without additional equipment, for example: roof rails or cross bars.
Specially designed internal locking system with aluminum locking guards to prevent unauthorized access. Use the strap to unlock the Tessera Roll+ automatically.
Specially designed wider, stronger slats for 100% load safety and rubber for maximum insulation.
2 specially designed '20' drainage systems with 2 overflow systems and integrated 'ANTI-LEAF' technology, for complete drainage and water protection.
An innovative rear slat design combined with the smallest tank dimensions (26cm x 30cm) offers the advantage of increased capacity in both length and height.
Specially designed tank cover for easy access and control of the Tessera Roll+.
Next generation powder coating (Class 2) with fine texture and high weather resistance.
Simple installation in vehicles with or without bedliner. In the case of Bedliner, it can be easily installed with UNDER-rail or OVER-rail types.
Easy and quick installation without drilling holes.
Aerodynamic design that reduces fuel consumption.
Stock:
0 pcs.
 |
|
|
|
|
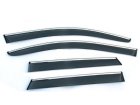
Vējsargi Honda CR-V
WINDOWS DEFLECTORS for Honda CR-V 2012-2017.,
Window deflectors are necessary and important accessory for the car. Deflectors will protect your car's interior from bad weather and strong winds, provide efficient ventilation and give the car an unforgettable and attractive look.
Deflectors will change the look of the car, make it individual and attractive at minimal cost.
This deflector model has the following advantages:
- the deflectors accurately replicate the geometry of the upper door frame, ensuring their maximum fit without gaps. In addition, they look natural and stylish on the door.
- they are made of impact-resistant and heat-resistant plastic, which ensures their reliability and long service life.
- a well-thought-out and convenient system for securing the deflectors guarantees their reliable fixing with the help of 3M adhesive tape (adhesive tape is included in the set) and, if all installation requirements are met, their spontaneous detachment or damage is prevented.
- The optimally selected deflector width contributes to maximum protection of the passenger compartment against the ingress of dust, rain, snow and wind when the windows are open.
- The special geometry of the windscreens, developed and tested in a special wind tunnel, makes it possible to improve the car's aerodynamics and reduce the level of aerodynamic noise generated by the car at high speeds.
Cobra Tuning deflectors optimally combine affordable costs and high quality products. They will be the perfect option for your car and will allow you to change its look at minimal cost.
Side window deflectors solve several problems at the same time:
- allows the side windows to always be clean, protecting them from dirt and water,
- serves as additional protection against sunlight,
- gives the car individuality,
- increases the car's aerodynamics and increases comfort in the cabin.
Deflectors are the best solution for your vehicle. They are quick and easy to install, look impressive and have high mechanical strength.
Installing deflectors on the side windows will not be difficult even for a beginner - this process does not require special knowledge and special tools. If necessary, our experts can advise you on all the nuances of installing window deflectors for your car model.
Stock:
0 pcs.
 |
|
|
|
|
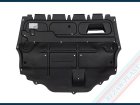
Kartera aizsargs OPEL ASTRA (J )/ASTRA( K)
Crankcase protection RP150826.
Nr OE: 1401033, 13368661
Designed for car models:
- OPEL ASTRA J IV Liftback (P10) 2009-2015
Petrol engine versions: 1.4 (74 kW), 1.6 (125 kW, 132 kW),
Diesel engine versions: 1.3 (70 kW), 1.6 (81 kW, 100 kW), 1.7 (81 kW, 92 kW, 96 kW), 2.0 (118 kW, 121 kW, 143 kW).
- OPEL ASTRA J IV GTC 2011-2018
Petrol engine versions: 1.4 (74 kW, 88 kW, 103 kW), 1.6 (125 kW, 132 kW, 147 kW), 1.8 (103 kW), 2.0 (206 kW).
Diesel engine versions: 1.6 (81kW, 100kW), 1.7 (81kW, 96kW), 2.0 (121kW, 143kW).
- OPEL ASTRA J IV Saloon (P10) 2012–2015
Petrol engine versions: 1.4 (74kW, 88kW, 103kW), 1.6 (85kW, 125kW, 132kW).
LPG petrol engine version: 1.4 (103kW),
Diesel engine versions: 1.3 (70kW), 1.6 (81kW, 100kW), 1.7 (81kW, 96kW).
- OPEL ASTRA J IV Sports Tourer (P10) 2010–2015
Petrol engine versions: 1.4 (64kW, 74kW, 88kW, 103kW), 1.6 (85kW, 125kW, 132kW),
LPG petrol engine version: 1.4 (103kW),
Diesel engine versions: 1.3 (70kW), 1.6 (81kW, 100kW), 1.7 (74kW, 81kW, 92kW, 96kW), 2.0 (118kW, 121kW, 143kW).
- OPEL ASTRA K V Hatchback, Sports Tourer (B16) 2015–2022
Petrol engine versions: 1.0 (77kW), 1.4 (74kW, 92kW, 110kW), 1.6 (147kW),
CNG petrol engine version: 1.4 (81kW),
Diesel engine versions: 1.6 (70kW, 81kW, 100kW, 118kW).
Stock:
0 pcs.
 |
|
|
|
|
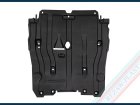
Under engine cover RENAULT MEGANE/TALISMAN/TALISMAN GRANDTOUR
Crankcase protection RP151031.
Nr OE: 758909807R
Designed for car models:
- RENAULT MEGANE III Coupe (DZ0/1_) 2014-2016
Petrol engine version: 2.0 R.S (201 kW)
- RENAULT MEGANE IV Liftback (B9A/M/N_) 2015-2024
Petrol engine versions: 1.2 (74kW, 97kW), 1.6 (84kW, 121kW, 151kW), 1.8 RS (205kW),
Diesel engine versions: 1.5 (66 kW, 81 kW), 1.6 (96 kW, 120 kW).
- RENAULT MEGANE IV Grandtour (K9/M/N_) 2016-2024
Petrol engine versions: 1.2 (74 kW, 97 kW), 1.6 (84 kW, 121 kW, 151 kW),
Diesel engine versions: 1.5 (66 kW, 81 kW), 1.6 (96 kW, 120 kW).
- RENAULT TALISMAN (LP_) 2015–2022.
Petrol engine versions: 1.6 (110 kW, 147 kW), 1.8 (165 kW),
Diesel engine versions: 1.5 (81 kW), 1.6 (96 kW, 118 kW), 1.7 (88 kW, 110 kW).
- RENAULT TALISMAN Grandtour (KP_) 2016–2022.
Petrol engine versions: 1.6 (110kW, 147kW), 1.8 (165kW),
Diesel engine versions: 1.5 (81kW), 1.6 (96kW), 1.7 (88kW, 110kW).
Stock:
0 pcs.
|
|
|
|
|
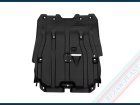
Kartera aizsargs RENAULT SCENIC
Crankcase protection RP151030.
Nr OE: 758906027R
Designed for car model:
- RENAULT SCENIC IV, 2019-2022, petrol and diesel engine versions.
Stock:
0 pcs.
|
|
|
|
|
Kartera aizsargs AUDI A1/S1
Crankcase protection RP150141.
Nr OE: 6C0825235A
Designed for car models:
- AUDI A1 I (8X1, 8XK) 2014-2018
Petrol engine versions: 1.0 (60 kW, 70 kW), 1.4 (92 kW, 110 kW), 1.8 (141 kW),
Diesel engine versions: 1.4 (66 kW), 1.6 (85 kW).
- AUDI S1 I (8X1, 8XK) 2014-2018
Petrol engine versions: 2.0 (170 kW).
- AUDI A1 I Sportback (8XA, 8XF) 2014-2018
Petrol engine versions: 1.0 (60 kW, 70 kW), 1.4 (92 kW, 110 kW), 1.8 (141 kW),
Diesel engine versions: 1.4 (66 kW), 1.6 (85 kW).
- AUDI S1 I Sportback (8XA, 8XF) 2014–2018.
Petrol engine version: 2.0 (170 kW).
Stock:
0 pcs.
|
|
|
|
|
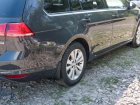
Dubļu aizsargi (kompl.) VW GOLF VII
The mud flaps effectively protect the underbody and bumpers against excessive dirt. In addition, they also enormously reduce dangerous road chippings and water spray.
Color: matte black.
Installation is made on regular seats of the car.
The main purpose: to protect the lower part of the car body from chipping, scratching.
With such model mud flaps on your car, you will get rid of such problems as:
- dirt on the bottom of the car,
- intense pollution of the side of the car, starting from the front wings,
- reduction of accumulated dirt or snow on the vehicle’s rapids.
Stock:
0 pcs.
|
|
|
|
|
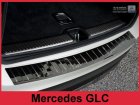
Aizmugures bampera uzlika MERCEDES GLC (X253)
Do you often ship purchases, baggage, building materials, or travel with a dog?
✔️ Cover for the paint of the rear bumper (mechanical damage, scratches, abrasions, chips).
Is the rear bumper broken or damaged?
✔️ Ability to cover a damaged item.
The car is not a garage? Frequent visits to a car wash?
✔️ Protection against external factors (moisture, road salt, car wash products, etc.).
Want to enhance or highlight the look of your car?
✔️ Gives the car an exclusive character and unique appearance.
The rear bumper trim Avisa is the perfect solution for your car, as it has both protective functions and looks great as a decorative element. Resistant to weather conditions (temperature -40 ° С / + 50 ° С) and visits to a car wash (moisture).
This is not a typical chrome strip because it is made of polished stainless steel. Thanks to cleaning, its surface scales perfectly between hard chrome and a deep matte layer.
The bent edge of the bumper is also closed in the cover plate through a specially profiled bend. It is fixed using a double-sided tape, which is located on all four edges of the plank.
Attention! The product must be glued carefully, since it is impossible to repeat the installation after a single fixation.
After installing the lining, you can easily load and remove luggage, and the scratched item now covers an exclusive accessory.
You will receive the case in a sturdy packaging with assembly instructions 'Step by Step'. and 3M degreasing material. The kit also includes a tube Autosol (5 ml) - polishing and updating stainless steel. The excellent formula of the preparation provides a steel surface with a long-lasting gloss without scratches and a strong protective layer.
Stock:
0 pcs.
 |
|
|
|
|
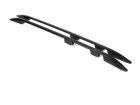
Jumta reliņi Citroen Jumpy/Space Tourer,Peugeot Expert,Opel Vivaro/Zafira Life,Toyota Proace
Roof rails.
Designed for car models:
-Citroen Jumpy, L2, 2016 -
-Citroen Spacetourer, L2, 2016 -
-Fiat Scudo, L2, 2022-
-Fiat Ulysse, L2, 2022-
-Opel Vivaro, L2, 2020-
- Opel Zafira Life, L2, 2020-
- Peugeot Expert, L2, 2016 -
- Peugeot Traveller, L2, 2016 -
-Toyota Proace, L2, 2016-
-Toyota Proace Verso, L2, 2016-
Color: black.
Material: aluminum.
Consists of two parts, are installed in the original places. Designed for L2 version (medium base).
Stock:
> 1 pcs.
|
|
|
|
|
Kartera aizsargs AUDI A5/E-TRON GT/RS6/RS7
Crankcase protection RP150135.
Nr OE: 4K0863821F
Designed for car models:
- AUDI A5 III Limousine (8B) 2025 -, petrol and diesel engines,
- AUDI RS6 V C8 (4A), RS6 V C8 Plus Avant Quattro (4A), 2020-2025, petrol and diesel engines,
- AUDI RS7 II Sportback (4K) 2020-2025, petrol and diesel engines,
- AUDI E-TRON GT (F8) Grand Tourer 2021 г. -, electric (BEV).
Stock:
0 pcs.
|
|
|
|
|
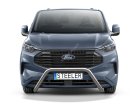
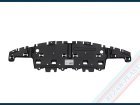
Front bar FORD TRANSIT CUSTOM/TOURNEO CUSTOM, VW T7
Stock:
0 pcs.
|
|
|
|
|
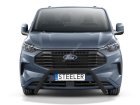
Front bar FORD TRANSIT CUSTOM/TOURNEO CUSTOM, VW T7
Stock:
0 pcs.
|
|
|
|
|
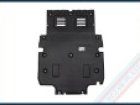
Paklājs bagāžniekā CITROEN C3 IV
Approximate product dimensions (cm):73 x 103
Rubber trunk mat with edges from the Polish manufacturer Rezaw-Plast.
The rubber trunk mat is manufactured using 3D scanning technology, which allows you to take into account the floor configuration of each car model. The Rezaw-Plast car trunk mat is manufactured in the EU and meets European standards. The mat is made of environmentally friendly material - rubber, it is sufficiently plastic and does not smell like rubber. The height of the side edges is 3-4 cm, it fits perfectly in the trunk of the car and effectively protects it from dirt and damage.
Car mat care is very simple: it should be removed from the trunk of the car, shake off dirt and rinse under a water pressure jet or wipe with a damp cloth. The surface of the mat can be easily cleaned with a cleaning agent.
Stock:
0 pcs.
|
|
|
|
|
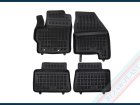
Paklāji salonā gumijas TOYOTA YARIS IV
Interior rubber mats Rezaw-Plast - especial made rubber mats for each model using 3D floor scan technology.
- High edges protects interior from getting water and mud under the mat.
- No rubber smell, is acid and oil neutral.
- Surface with protector designed to prevent boots sliding, and also mat sliding on floor surface.
- Fixation kit for original fixation points is not included. It is can be purchased separately.
- Easy washes with water or car shampoo.
Stock:
0 pcs.
|
|
|
|
|
Paklāji salonā gumijas TOYOTA COROLLA XII
Interior rubber mats Rezaw-Plast - especial made rubber mats for each model using 3D floor scan technology.
- High edges protects interior from getting water and mud under the mat.
- No rubber smell, is acid and oil neutral.
- Surface with protector designed to prevent boots sliding, and also mat sliding on floor surface.
- Fixation kit for original fixation points is not included. It is can be purchased separately.
- Easy washes with water or car shampoo.
Stock:
0 pcs.
Sorry
Image not available
|
|
|
|
|
Paklāji salonā gumijas TOYOTA CAMRY VIII
Interior rubber mats Rezaw-Plast - especial made rubber mats for each model using 3D floor scan technology.
- High edges protects interior from getting water and mud under the mat.
- No rubber smell, is acid and oil neutral.
- Surface with protector designed to prevent boots sliding, and also mat sliding on floor surface.
- Fixation kit for original fixation points is not included. It is can be purchased separately.
- Easy washes with water or car shampoo.
Stock:
0 pcs.
Sorry
Image not available
|
|
|
|
|
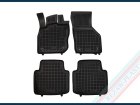
Paklāji salonā gumijas SKODA SUPERB IV
Interior rubber mats Rezaw-Plast - especial made rubber mats for each model using 3D floor scan technology.
- High edges protects interior from getting water and mud under the mat.
- No rubber smell, is acid and oil neutral.
- Surface with protector designed to prevent boots sliding, and also mat sliding on floor surface.
- Fixation kit for original fixation points is not included. It is can be purchased separately.
- Easy washes with water or car shampoo.
Stock:
> 1 pcs.
|
|
|
|
|